Get Started with Your First Automation
Welcome to NimbleBrain Studio! This quickstart guide walks you through the Nira-powered onboarding experience you’ll encounter on your first login.New to Studio? When you log in for the first time, Nira will automatically guide you through this process. This documentation is here for reference.
What You’ll Build
In this tutorial, Nira will help you create a simple but powerful automation. You’ll learn:- How to interact with Nira conversationally
- How Nira selects and configures the right tools
- How to provide API credentials securely
- How to deploy and monitor your automation

Prerequisites
All you need is:- A web browser (Chrome, Firefox, Safari, or Edge)
- A GitHub or Google account for authentication
- ☕ 5 minutes of your time
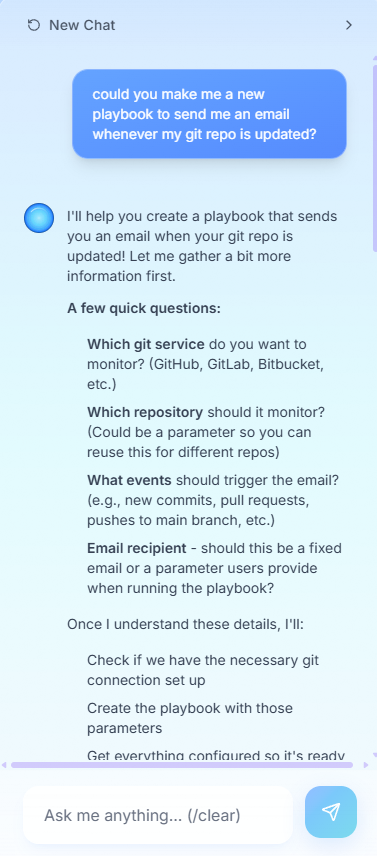
Step 1: Nira’s Introduction
When you first log into NimbleBrain Studio at studio.nimblebrain.ai, you’ll see Nira’s welcome message:Nira says: 👋“Hi! I’m Nira, your automation assistant. I’m here to help you build powerful automations through simple conversation.Let’s create your first automation together! I’ll guide you through every step.Ready to get started?”
Don’t worry about making mistakes. Nira is patient and will help you every step of the way!
Step 2: Describe Your Automation
Nira will ask you what you’d like to automate. For this tutorial, try one of these examples:Example 1: Weather Alert (Easiest)
Example 1: Weather Alert (Easiest)
Say to Nira:“Send me a Slack message every morning at 8am with today’s weather forecast for San Francisco”What Nira does:
- Uses OpenWeatherMap for weather data
- Connects to Slack for messaging
- Creates a daily 8am schedule
- Asks for your OpenWeatherMap API key and Slack credentials
Example 2: Daily Calendar Summary
Example 2: Daily Calendar Summary
Say to Nira:“Create a daily summary of my Google Calendar events and email it to me at 6am”What Nira does:
- Connects to Google Calendar
- Formats your day’s events
- Sends email via your preferred email service
- Asks for Google Calendar and email credentials
Example 3: Price Monitor
Example 3: Price Monitor
Say to Nira:“Check Bitcoin price every hour and notify me on Slack if it goes above $100,000”What Nira does:
- Sets up cryptocurrency price tracking
- Implements conditional logic (only alert if > $100k)
- Schedules hourly checks
- Asks for Slack credentials
What Nira Does Behind the Scenes
When you describe your automation, Nira:Step 3: Add Your API Keys
Nira will identify which services you need and prompt for credentials:Nira says: 🔑“Great! To build this automation, I need access to:
- OpenWeatherMap API (for weather data)
- Slack (to send you messages)
Follow Nira's Guidance
Nira provides direct links to get API keys from each service:
- Click the link Nira provides
- Sign up or log in to the service
- Generate your API key
- Copy it
Taking too long? No worries! Nira saves your progress. You can come back later to finish adding credentials.
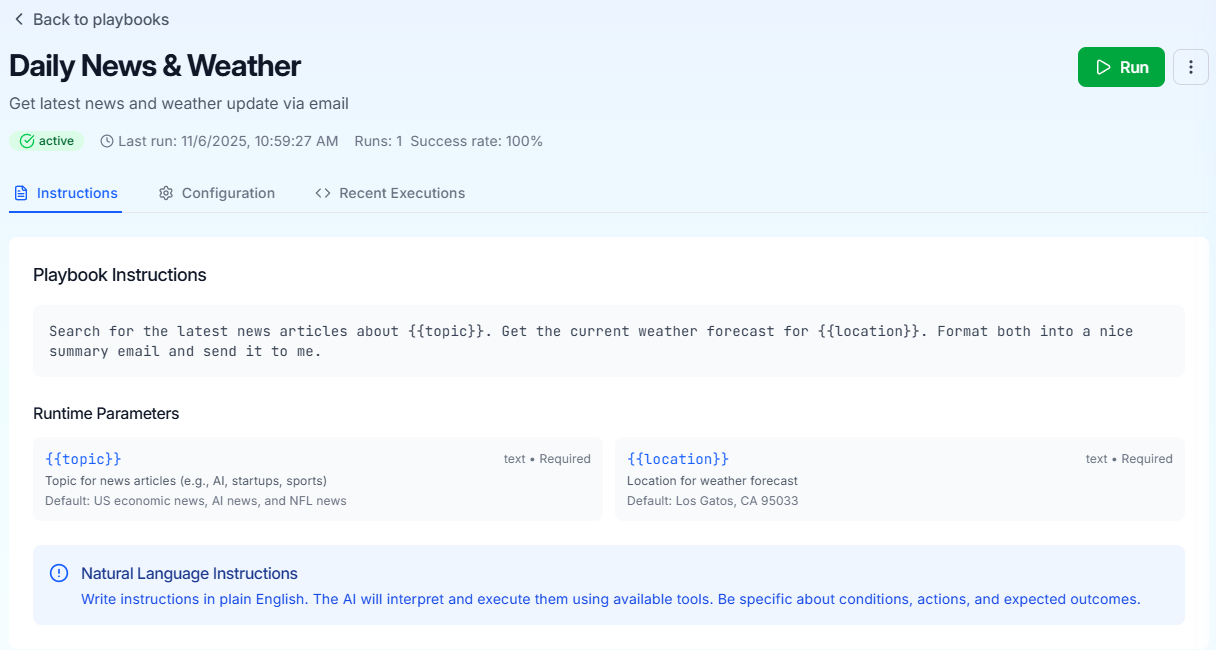
Step 4: Review Your Playbook
Once you’ve added credentials, Nira shows you the generated playbook before deploying:Nira says: 📋“Here’s what I’ve built for you:Automation Name: Morning Weather Alert
Schedule: Daily at 8:00 AM Pacific Time
Tools Used: OpenWeatherMap, SlackWhat it does:
- Fetches current weather and 24-hour forecast for San Francisco
- Formats a friendly message with temperature, conditions, and forecast
- Sends to your Slack DM
- ✅ Deploy Now - Launch your automation immediately
- ✏️ Edit - Ask Nira to modify anything (“Change it to 7am” or “Add wind speed”)
- 👀 View Details - See the full playbook configuration
- 🗑️ Start Over - Have Nira build something different
Step 5: Deploy & Test
Click “Deploy Automation” and Nira handles the rest: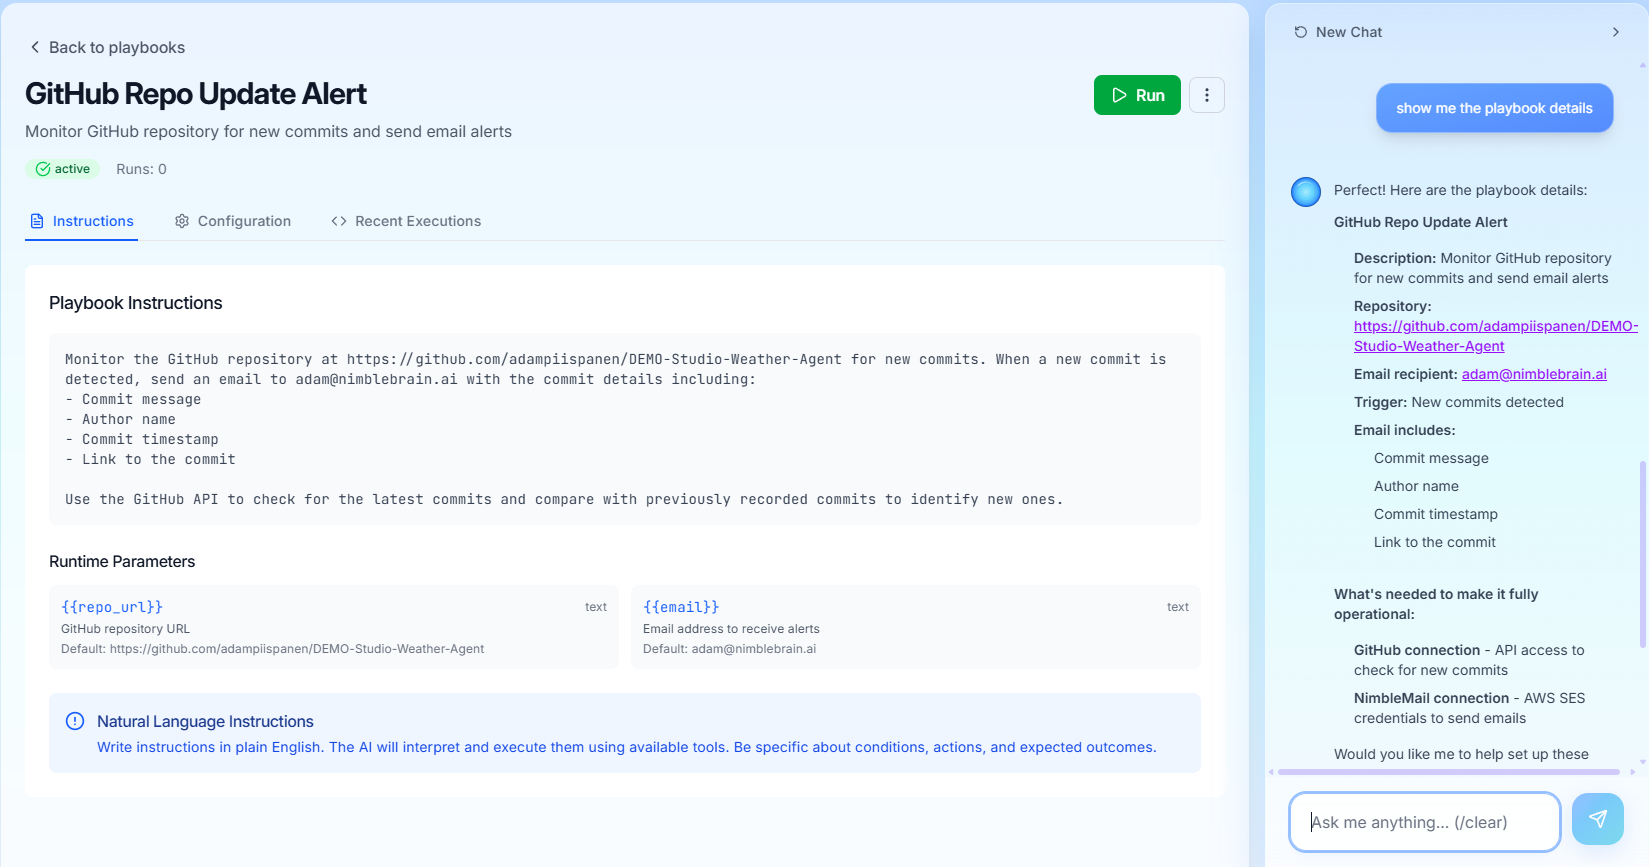
Congratulations! 🎉 You’ve built your first automation with Nira. Check your Slack for the test message!
Step 6: Monitor & Manage
After deployment, Nira shows you how to:View Execution History
See when your automation ran and what it did
Check Logs
Detailed logs for troubleshooting
Edit Automation
Ask Nira to modify your automation anytime
Pause/Resume
Temporarily stop or restart your automation
Found an issue? Just tell Nira! She can help troubleshoot and fix problems.
What’s Next?
Now that you’ve completed the tutorial, you can:Build More Automations
Ask Nira to create more complex workflows
Explore Connections
See all 50+ integrations Nira can use
Learn About Playbooks
Understand how Nira structures automations
Connect to Claude
Use your automations in Claude Desktop
Workspace Management
Organize automations across projects
Activity Logs
Track all workspace activity
Tips for Working with Nira
Make the most of your Nira experience with these tips:Be Specific About Timing
Be Specific About Timing
Good: “Every Monday at 9am”
Better: “Every weekday at 9am except holidays”
Best: “Every Monday, Wednesday, and Friday at 9am Pacific Time”Nira understands natural language timing but specificity helps ensure you get exactly what you want.
Name Your Data Sources
Name Your Data Sources
Vague: “Get sales data”
Better: “Get sales data from Stripe”
Best: “Get yesterday’s sales data from our Stripe account and calculate total revenue”The more specific you are about WHERE data comes from, the better Nira can build your automation.
Describe the Output Format
Describe the Output Format
Basic: “Send me a report”
Better: “Email me a report”
Best: “Email me a PDF report with charts showing revenue trends”Tell Nira HOW and WHERE you want results delivered.
Ask for Modifications Anytime
Ask for Modifications Anytime
You can always refine automations:
- “Make the report more detailed”
- “Change the schedule to 6am”
- “Add weather data to the summary”
- “Only send alerts if revenue is above $10k”
Use Examples
Use Examples
Show Nira what you want:
- “Format it like: ‘Today’s weather: 72°F, Sunny. Forecast: Clear skies.’”
- “Include metrics similar to last week’s report”
Common Questions
Can I edit Nira's automations manually?
Can I edit Nira's automations manually?
Yes! Every automation Nira creates is a standard playbook you can view and edit. Click on any playbook to see its configuration, instructions, and settings.You can switch between Nira mode and manual mode anytime.
What if Nira doesn't understand my request?
What if Nira doesn't understand my request?
Nira will ask clarifying questions:
- “Could you be more specific about the timing?”
- “Which email address should I send to?”
- “What should trigger this automation?”
How do I know what tools/services Nira can use?
How do I know what tools/services Nira can use?
Browse Connections to see all 50+ integrations. Nira automatically knows about all of them and will select the best ones for your needs.If Nira doesn’t have an integration for something, she’ll let you know and may suggest alternatives.
Can Nira build really complex automations?
Can Nira build really complex automations?
Absolutely! Nira can handle:
- Multi-step workflows with conditional logic
- Automations that use 5+ different tools
- Scheduled tasks with complex timing rules
- Data transformations and calculations
What happens if my automation fails?
What happens if my automation fails?
Nira monitors all automations and will:
- Notify you if something fails
- Show you detailed error logs
- Help you fix the issue
Troubleshooting
Nira says she needs more information
Nira says she needs more information
Issue: Your request was too vague.Solution: Be more specific about:
- Timing (“when should this run?”)
- Data sources (“which service has the data?”)
- Output destination (“where should results go?”)
API key connection failed
API key connection failed
Issue: The credentials you entered aren’t working.Solution:
- Double-check you copied the entire key (no extra spaces)
- Verify the key hasn’t expired
- Make sure the account has proper permissions
- Try regenerating the key and adding it again
Automation didn't run on schedule
Automation didn't run on schedule
Issue: Your automation missed its scheduled time.Solution:
- Check the execution logs in the Monitoring tab
- Nira may have encountered an issue with an external service
- Click “Run Now” to test manually
- Ask Nira: “Why didn’t my weather alert run this morning?”
Results aren't formatted how I want
Results aren't formatted how I want
Issue: The output format doesn’t match your expectations.Solution: Tell Nira exactly how you want it formatted:
- “Make the report shorter and only include the top 3 items”
- “Add emojis to make it more visual”
- “Format dates as MM/DD/YYYY instead of YYYY-MM-DD”
Nira is taking a long time to respond
Nira is taking a long time to respond
Issue: Nira seems slow or unresponsive.Solution:
- Check your internet connection
- Refresh the page
- If the issue persists, the platform may be experiencing high load—try again in a few minutes
Real User Examples
See what others have built with Nira on their first try:Sarah, Marketing Manager 📊“I need a weekly report showing our social media metrics from Twitter and Instagram, formatted as a nice email with graphs”Result: Nira created an automation that runs every Monday at 9am, pulls metrics from both platforms, generates comparison charts, and emails a professional report. Built in 4 minutes.
Mike, Small Business Owner 🏪“Alert me on Slack whenever someone leaves a 1-star review on Google My Business so I can respond quickly”Result: Nira set up real-time monitoring that checks every 30 minutes and sends instant Slack alerts with the review text and a link to respond. Built in 3 minutes.
Jamie, Sales Team Lead 💼“Every Friday afternoon, send me a summary of all deals closed this week from Salesforce, including total value and top 3 deals”Result: Nira built an automation that queries Salesforce every Friday at 4pm, calculates totals, ranks deals, and sends a formatted summary via email. Built in 5 minutes.
Need Help?
Nira is always available in your workspace to help, but here are other resources:Ask Nira
💬 She’s always in your workspace ready to help
Read the Docs
Contact Support
You’re All Set! 🎉
You’ve completed the quickstart and built your first automation with Nira. You now know how to:- ✅ Describe automations in natural language
- ✅ Add API credentials securely
- ✅ Review and deploy with confidence
- ✅ Monitor and modify automations
Pro tip: The more you use Nira, the better she understands your preferences and style. Build a few automations and watch how quickly you can go from idea to deployed solution.