NimbleBrain Studio makes it easy to connect your MCP servers to popular AI clients, code editors, and development frameworks with automatically generated configurations.
Available Integrations NimbleBrain supports integration with:
Claude Desktop Official Claude desktop application
Claude Code AI-powered coding assistant
Cursor AI-first code editor
Codex OpenAI Codex integration
ChatGPT OpenAI ChatGPT custom actions
LangChain Python/TypeScript agent framework
Getting Started
Install an MCP Server
Navigate to Connections and install an MCP server from the catalog
Click Connect
On any installed server, click the Connect button
Choose Your Client
Select the client you want to integrate with from the list
Follow Setup Instructions
Copy the generated configuration and follow the step-by-step guide
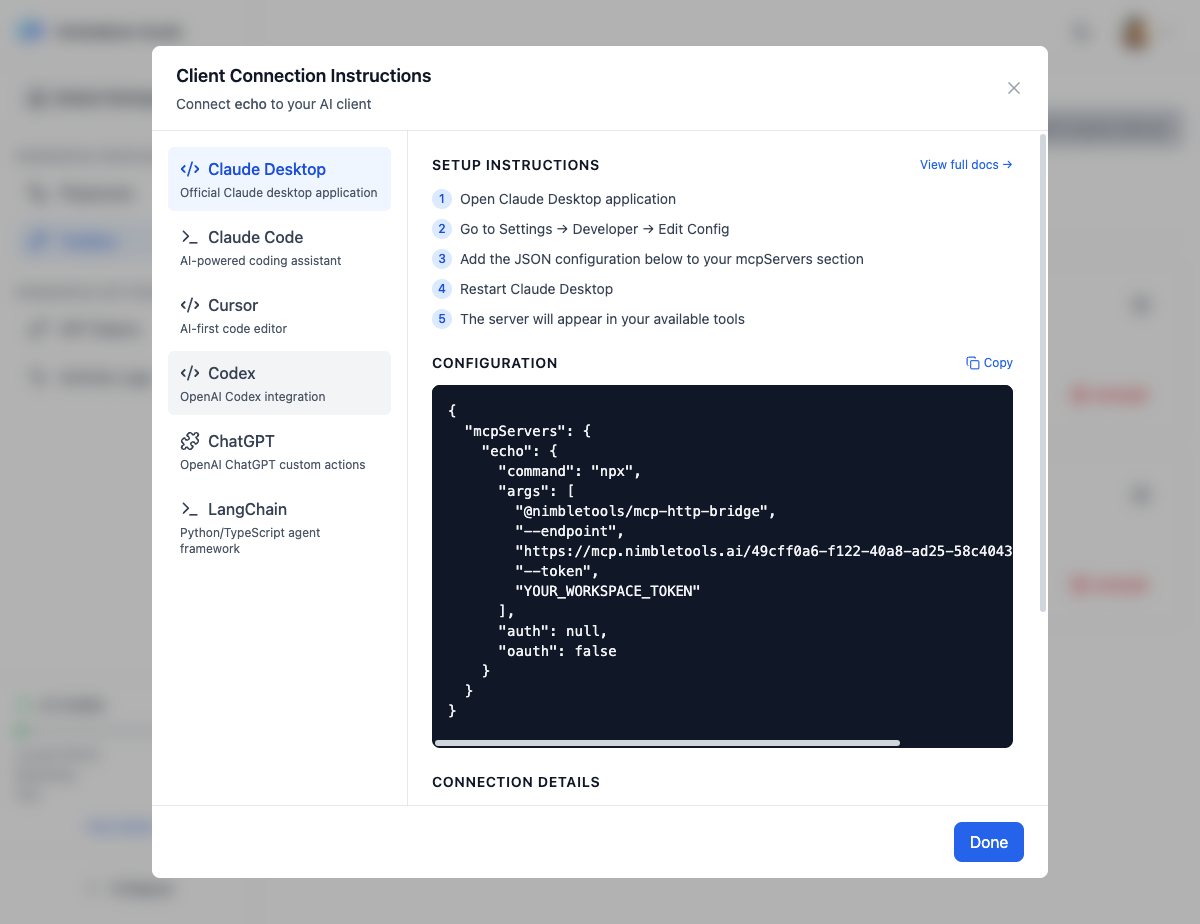
Claude Desktop Setup Instructions
Open Claude Desktop application
Launch the Claude Desktop app on your machine
Go to Settings → Developer → Edit Config
Navigate to the configuration editor in Claude Desktop settings
Add the JSON configuration below to your mcpServers section
Paste the generated configuration into your config file
Restart Claude Desktop
Fully quit and restart Claude Desktop
The server will appear in your available tools
Look for the 🔌 icon indicating tools are available
{ "mcpServers" : { "echo" : { "command" : "npx" , "args" : [ "@nimbletools/mcp-http-bridge" , "--endpoint" , "https://mcp.nimbletools.dev/{workspace-id}/{server-name}/mcp" , "--token" , "YOUR_WORKSPACE_TOKEN" ], "auth" : null , "oauth" : false } } } Configuration Files
macOS : ~/Library/Application Support/Claude/claude_desktop_config.jsonWindows : %APPDATA%\Claude\claude_desktop_config.json
Back up your existing config before making changes!
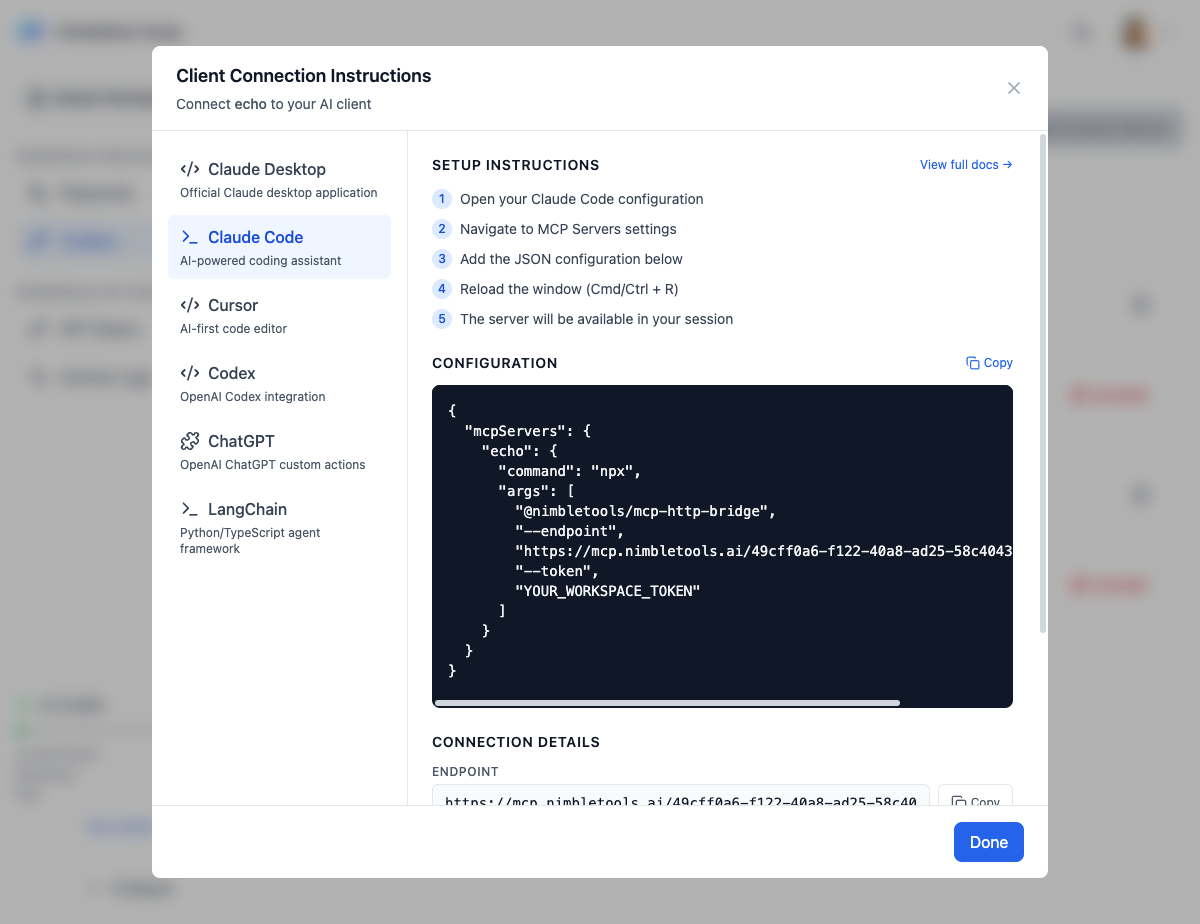
Claude Code Setup Instructions
Open your Claude Code configuration
Access Claude Code settings in your editor
Navigate to MCP Servers settings
Find the MCP configuration section
Add the JSON configuration below
Paste the generated JSON configuration
Reload the window (Cmd/Ctrl + R)
Restart Claude Code to apply changes
The server will be available in your session
The MCP server will now be accessible
{ "mcpServers" : { "echo" : { "command" : "npx" , "args" : [ "@nimbletools/mcp-http-bridge" , "--endpoint" , "https://mcp.nimbletools.dev/{workspace-id}/{server-name}/mcp" , "--token" , "YOUR_WORKSPACE_TOKEN" ] } } }
Claude Code uses a simplified configuration without auth fields.
Cursor Setup Instructions
Open Cursor settings (Cmd/Ctrl + ,)
Access the Cursor settings panel
Search for "MCP" or "Model Context Protocol"
Navigate to the MCP configuration section
Add the configuration below to your MCP servers
Paste the generated configuration
Restart Cursor
Fully quit and restart Cursor
Access the server through Cursor's AI features
Use Cursor’s AI chat and features with your MCP server
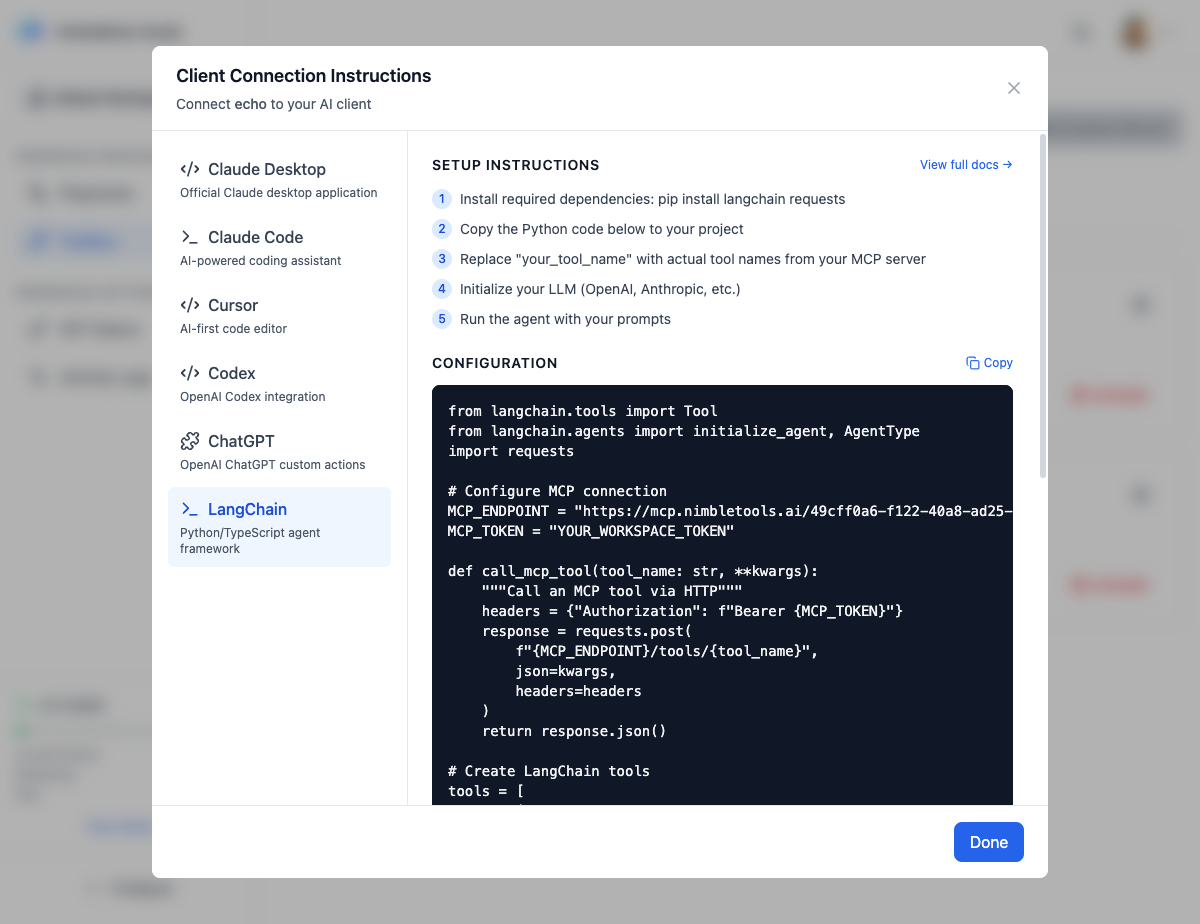
{ "mcpServers" : { "echo" : { "command" : "npx" , "args" : [ "@nimbletools/mcp-http-bridge" , "--endpoint" , "https://mcp.nimbletools.dev/{workspace-id}/{server-name}/mcp" , "--token" , "YOUR_WORKSPACE_TOKEN" ] } } } LangChain Setup Instructions
Install required dependencies
Run: pip install langchain requests
Copy the Python code below to your project
Use the generated Python integration code
Replace tool names with actual names from your MCP server
Update the tool configuration to match your server’s tools
Initialize your LLM (OpenAI, Anthropic, etc.)
Set up your preferred language model
Run the agent with your prompts
Execute the agent with your queries
Python Integration Code from langchain.tools import Tool from langchain.agents import initialize_agent, AgentType import requests # Configure MCP connection MCP_ENDPOINT = "https://mcp.nimbletools.dev/{workspace-id}/{server-name}/mcp" MCP_TOKEN = "YOUR_WORKSPACE_TOKEN" def call_mcp_tool ( tool_name : str , ** kwargs ): """Call an MCP tool via HTTP""" headers = { "Authorization" : f "Bearer { MCP_TOKEN } " } response = requests.post( f " { MCP_ENDPOINT } /tools/ { tool_name } " , json = kwargs, headers = headers ) return response.json() # Create LangChain tools tools = [ Tool( name = "echo" , func = lambda ** kwargs : call_mcp_tool( "your_tool_name" , ** kwargs), description = "Access echo MCP server" ) ] # Initialize agent agent = initialize_agent( tools, llm, agent = AgentType. ZERO_SHOT_REACT_DESCRIPTION , verbose = True )
Replace your_tool_name with actual tool names from your MCP server’s documentation.
Connection Details All integrations require two key pieces of information:
The MCP server endpoint URL in the format:
https://mcp.nimbletools.dev/{workspace-id}/{server-name}/mcp
Your workspace API token. Generate one in API Tokens settings.
Getting Your Access Token
Navigate to API Tokens
Click API Tokens in the sidebar under Workspace Settings
Click Create Token
Generate a new API token
Copy the Token
Copy the token value immediately (it won’t be shown again)
Replace in Configuration
Replace YOUR_WORKSPACE_TOKEN with your actual token
Security Best Practices
Never commit tokens to version control
Don’t share tokens publicly
Rotate tokens regularly (every 90 days)
Generate separate tokens for different services
Use Environment Variables
Store tokens in environment variables instead of hardcoding: export NIMBLEBRAIN_TOKEN = "your-token-here" Reference them in your code: import os MCP_TOKEN = os.getenv( "NIMBLEBRAIN_TOKEN" )
Create read-only tokens for monitoring and full-access tokens only when needed.
Check Activity Logs regularly to monitor token usage and detect unauthorized access.
Troubleshooting
Configuration not working
Possible causes :
Invalid JSON syntax
Token not replaced
Client not restarted
Solution :
Validate JSON with a validator
Ensure YOUR_WORKSPACE_TOKEN is replaced with actual token
Fully quit and restart the client application
Possible causes :
Token revoked or expired
Wrong token for workspace
Token not included in request
Solution :
Generate new token in API Tokens settings
Verify token is for the correct workspace
Check token is properly set in configuration
Possible causes :
Server scaled to zero (cold start)
Network issues
Server configuration error
Solution :
Wait 5-10 seconds for cold start
Check server logs in Connections
Verify server endpoint is accessible
Advanced Integration Custom HTTP Bridge Options The @nimbletools/mcp-http-bridge package supports additional options:
npx @nimbletools/mcp-http-bridge \ --endpoint "https://mcp.nimbletools.dev/..." \ --token "YOUR_TOKEN" \ --timeout 30000 \ --retry 3 Request timeout in milliseconds (default: 30000)
Number of retry attempts (default: 3)
Direct HTTP Integration You can also integrate directly via HTTP without the bridge:
const response = await fetch ( 'https://mcp.nimbletools.dev/{workspace-id}/{server-name}/mcp' , { method: 'POST' , headers: { 'Authorization' : `Bearer ${ YOUR_TOKEN } ` , 'Content-Type' : 'application/json' }, body: JSON . stringify ({ method: 'tools/call' , params: { name: 'tool_name' , arguments: {} } }) });